Arduino Bluetooth Temperature & Humidity Sensor

Bluetooth devices are widely used in many consumer products, and many Arduino-compatible projects that were funded on Kickstarter are using Bluetooth. Bluetooth is fast, low-power, and like WiFi you can communicate with such devices straight from a computer or a mobile device because you usually have Bluetooth integrated in your device. In this project, you will learn how to connect a Bluetooth module to Arduino, transmit measurements from a temperature & humidity sensor to your computer, and display the data in a nice Python interface.
What you'll need
Step by step
Hardware Configuration
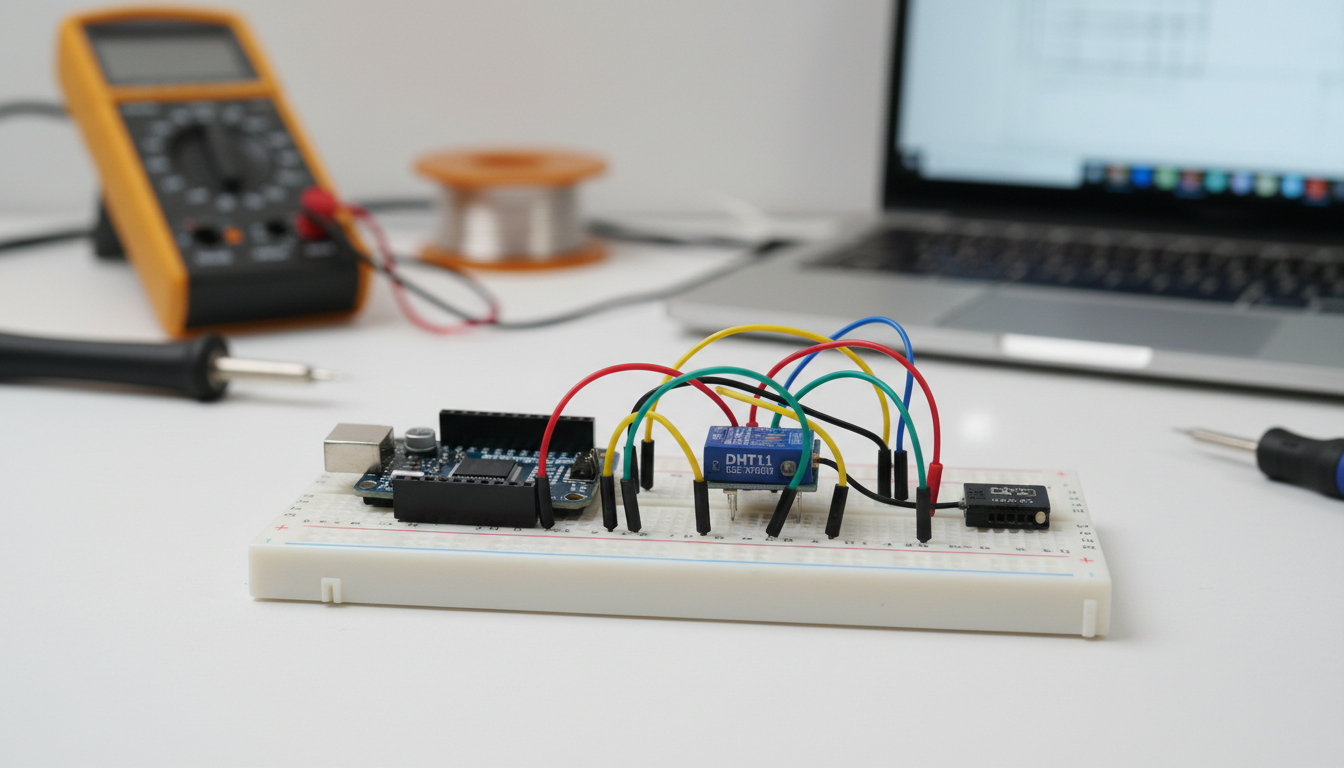
The hardware configuration consists of two parts: connecting the Bluetooth module to the Arduino board, and then connecting the DHT sensor. Start by plugging the Bluetooth module on the breadboard.
You then need to connect the power for the Bluetooth module: the 5V coming from the Arduino board, and the Ground pin.
Now, we have to make the connections from the Bluetooth board to the Arduino so that both can communicate via the Serial connection. Connect the Bluetooth TX pin to the Arduino RX (pin 0), and the RX pin to the Arduino TX (pin 1). You also have to connect the DTR pin of the Bluetooth board to the Arduino Reset pin (which is next to the 3.3V pin), via the 10uF capacitor (the negative side of the capacitor is marked with a gray line, and should be on the side of the Arduino Reset pin).
Finally, you need to plug the DHT temperature sensor to your project. Pin number 1 goes to the Arduino 5V, pin number 2 to Arduino pin 7, and pin number 4 to Arduino Ground. Finally, place the 4.7K resistor between pin number 1 and 2 of the DHT sensor.

Testing the Bluetooth Module
We'll now test the Bluetooth module to see if everything is connected correctly. You need to pair the Bluetooth module with your computer first. It depends on your OS, but you will usually have a "Bluetooth preferences" menu to search for new Bluetooth devices.
Once the device is paired with your computer, you can reopen the Arduino IDE and test if the Bluetooth connection is working. In Tools > Serial Port, you should have new choices for your Bluetooth device. Choose the second one.
You can now work with the Arduino IDE as if the Arduino board was directly connected to your computer: you can plug your Arduino board to an external source of power like a battery, and use the Bluetooth connection to upload sketches. To try it out, just load the "Blink" sketch, and click on upload: after a while the sketch should be uploaded (it takes longer than with a USB cable) and the onboard LED of the Arduino Uno should blink.
Writing the Arduino Sketch
We now need to write the code for the Arduino, so it measures the temperature & humidity when it receives a given command on the Serial port. This command will later be sent by your computer, but for now we'll just make a simple test to make sure the Arduino part is working.
The core of the sketch is to make the Arduino answer with the temperature & humidity measurement on the Serial port when a given character is received. I chose the character "m" for "measurement" to make the Arduino send the measurements over the Serial port. This is the code that does exactly that:
Now upload the sketch (via Bluetooth of course!), open the serial monitor, and type in "m" and click send.
This means whenever the Arduino will receive the character "m", it is going to return to correct measurements (in this case the temperature was at 20 degrees Celsius and the humidity was at 37 %).
Building the Python Interface
Finally, we need to build an application running on your computer to send the order to get new measurements from the Arduino board, retrieve the data, and display it on your screen. I chose Python for this interface but it's quite easy to interface with the Serial port with PySerial, and it is also easy to build an interface with Tkinter which is installed by default with Python.
The Python code starts by initialising the Serial connection and then the core of the Python script is the measure() function that is continuously executed every second.
Then, the rest of the script simply displays this data on a simple Tkinter window. You can get the complete code from the GitHub repository for this project. Finally, type "python sensor_gui.py" in a terminal.
Completion and Next Steps
Congratulations, you just built a Bluetooth temperature & humidity sensor! Of course, you can use the code found in this project to interface other sensors to your computer via Bluetooth, for example ambient light sensors or motion sensors. Each new Bluetooth module that you add will appear as a new Serial Port on your computer, so you can perfectly have several of these Bluetooth-based sensors in your home and build a whole home automation system from it!
Wrapping up
This project demonstrates how to build a wireless sensor system using Arduino and Bluetooth. The combination of hardware and software allows you to create a complete home automation solution that can be extended with additional sensors. You can use this foundation to build more complex projects involving multiple sensors, data logging, or cloud integration.